


Sourdough Shokupan (Japanese Milk Bread)
This Japanese-style bread has a light, fluffy texture that you will love, perfect for sandwiches, toast, and even pizza!


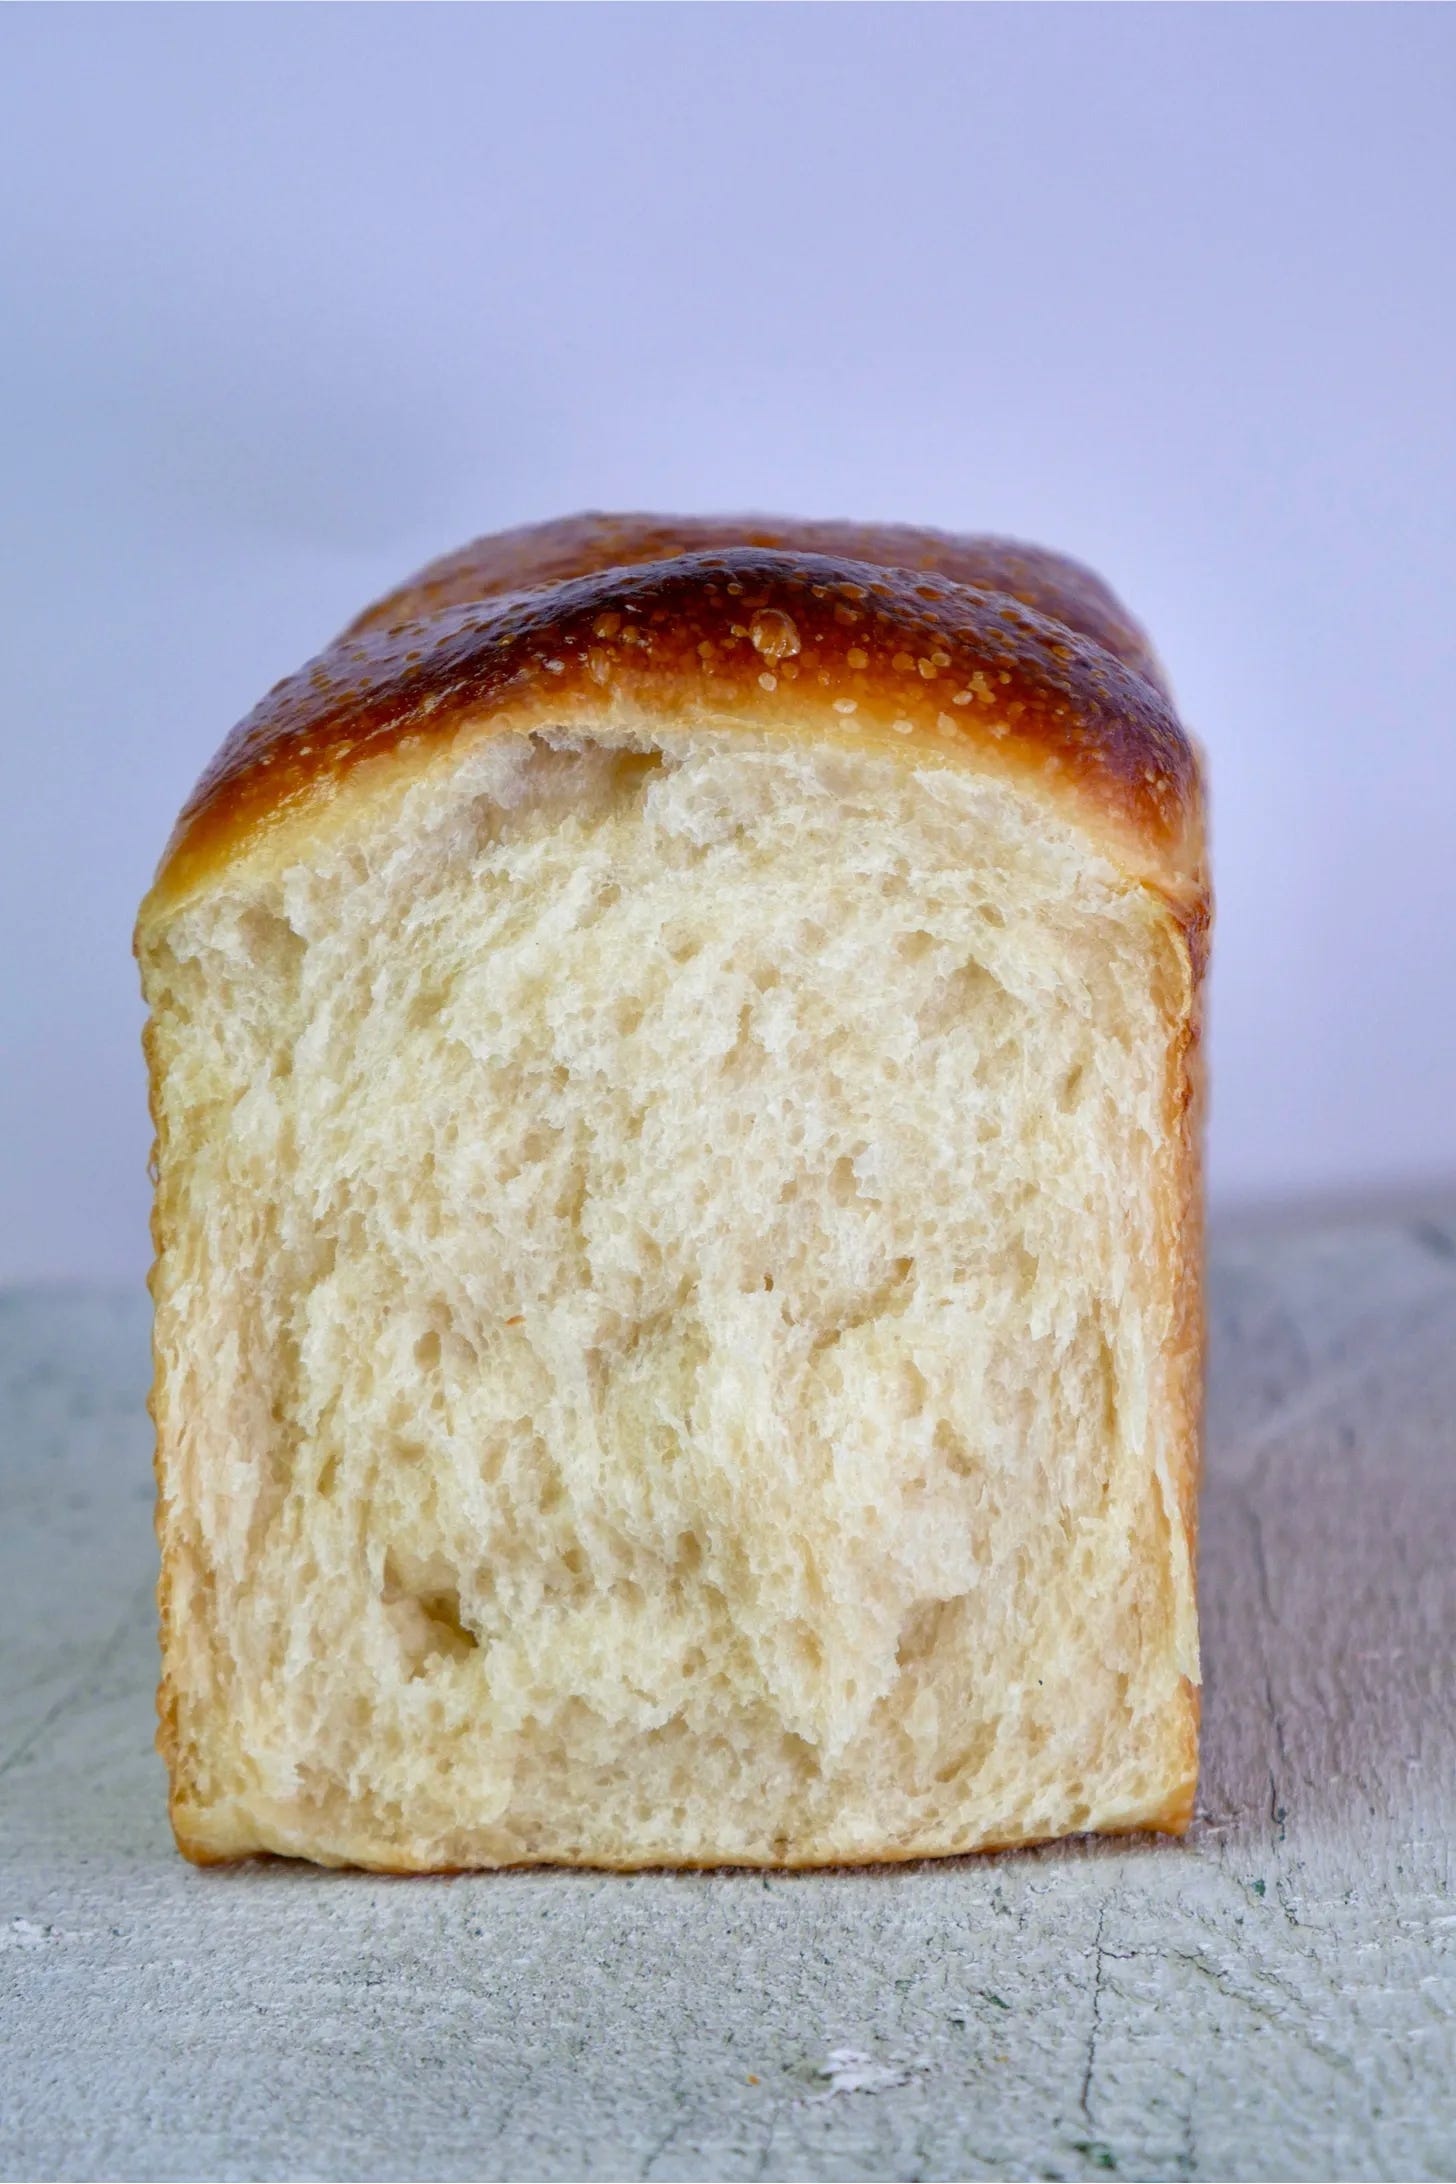
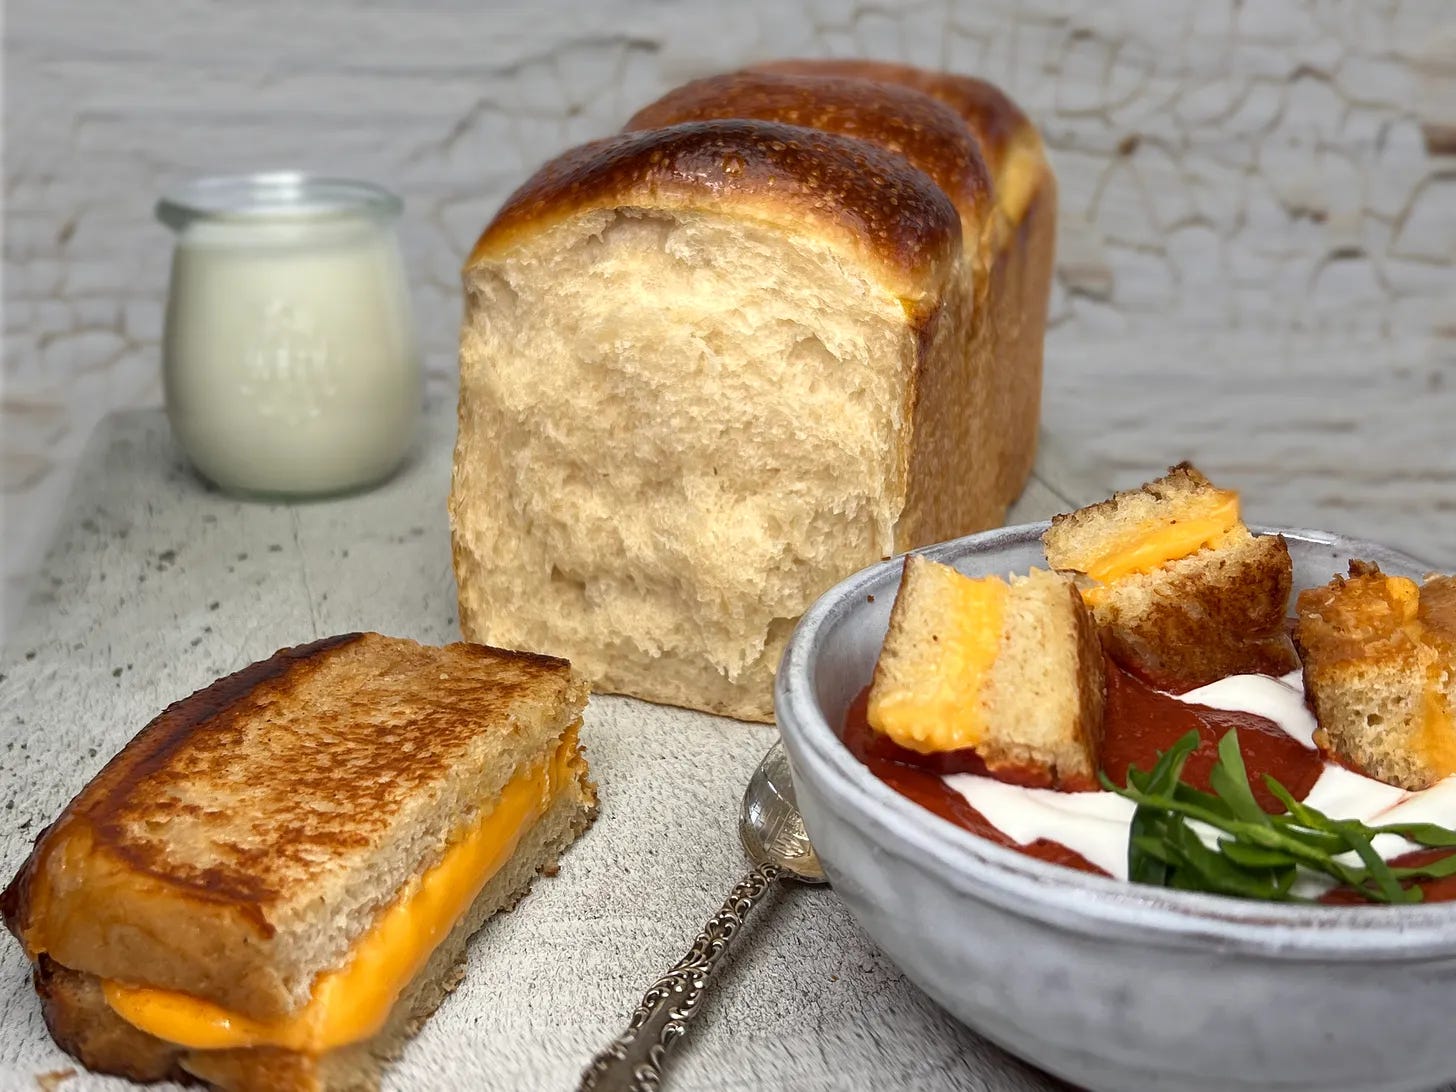
Shokupan is a Japanese-style white milk bread renowned for its soft, fluffy texture and subtle sweetness. Its name literally translates to "eating bread.” Shokupan's hallmark is its lightness and airy crumb, making it a delightful choice for any meal or snack. Some typical ways to eat Shokupan are to make fruit and cream sandwiches called Sando, toast it and slather with jam or butter, eat it on its own, or even make a pizza …. yes Shokupan PIZZA!
* Our version of Shokupan is leavened with a stiff cultivated levain rather than commercial yeast. Yeast may be substituted for the levain; however, the final dough weight per the recipe will be less.

On Measurements: My preferred method of measurement is weight by grams. Baking by volume rather than weight can lead to varied and unexpected results. Flour is especially problematic when measured by volume (sifted, not sifted, spooned, not spooned, fluffed or not … you get the point). Grams are always the same; they are your friend as a baker.
For High-Altitude Bakers: Altitude ranges DO impact your baking; adjustments in ingredients, time, and temperature are often needed. It would be impractical to provide a recipe at, let’s say at 5,000 ft for Denver, when your kitchen is at sea level or at 9,000 ft. Mountaintop Kitchen is at 6,700 ft. A better practice is to calibrate your recipes for your unique altitude against sea-level recipes using a reliable source such as this chart from King Arthur Baking Company. This way; if you’re baking in Detroit (my hometown), Denver, Toas, or in the Sierra Made Occidental (our location), you can make informed adjustments. For more detailed information visit the Colorado State University Extension and the New Mexico State University pages on high-altitude considerations.
Stiff Sweet Levain
60g all-purpose flour
28g water
7g sourdough starter fed or unfed
10g sugar (I prefer raw unrefined raw sugar)
Substitution: In place of stiff sweet levain, you can use 3g of instant yeast.
Tangzhong
40g all-purpose flour
170g water
Dough
75g whole milk
1 large egg (50g)
105g stiff sweet levain (fully activated overnight)
6g salt
30g sugar
7g milk powder
300g bread flour (all-purpose as a substitute)
28g unsalted softened butter
Egg Wash
1 large egg (50g)
1 Tbsp milk

Day 1
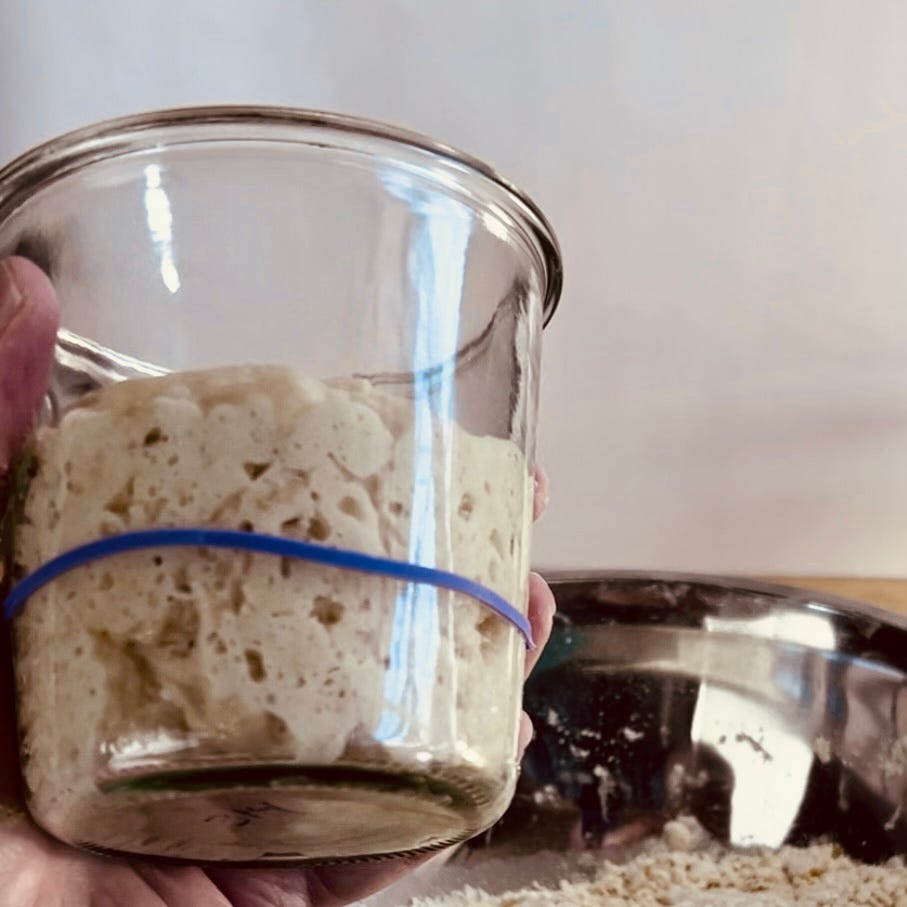
To make the stiff sweet levain (9PM): In a clean jar; mix the flour, water, sourdough starter, and sugar the night before you plan to make the milk bread. This is a stiff mixture, so press it down into the bottom of the jar with a spoon or spatula until it is mostly level.
Cover the jar and use a rubber band or piece of tape to mark the top level of the mixture.
Place the covered jar in a warm spot (approx. 77°+F) until doubled in size; this can take up to 8 hours or so. If your space is cold and you don’t have a proofing box, try placing the jar in the oven with only the light bulb turned on.
Day 2
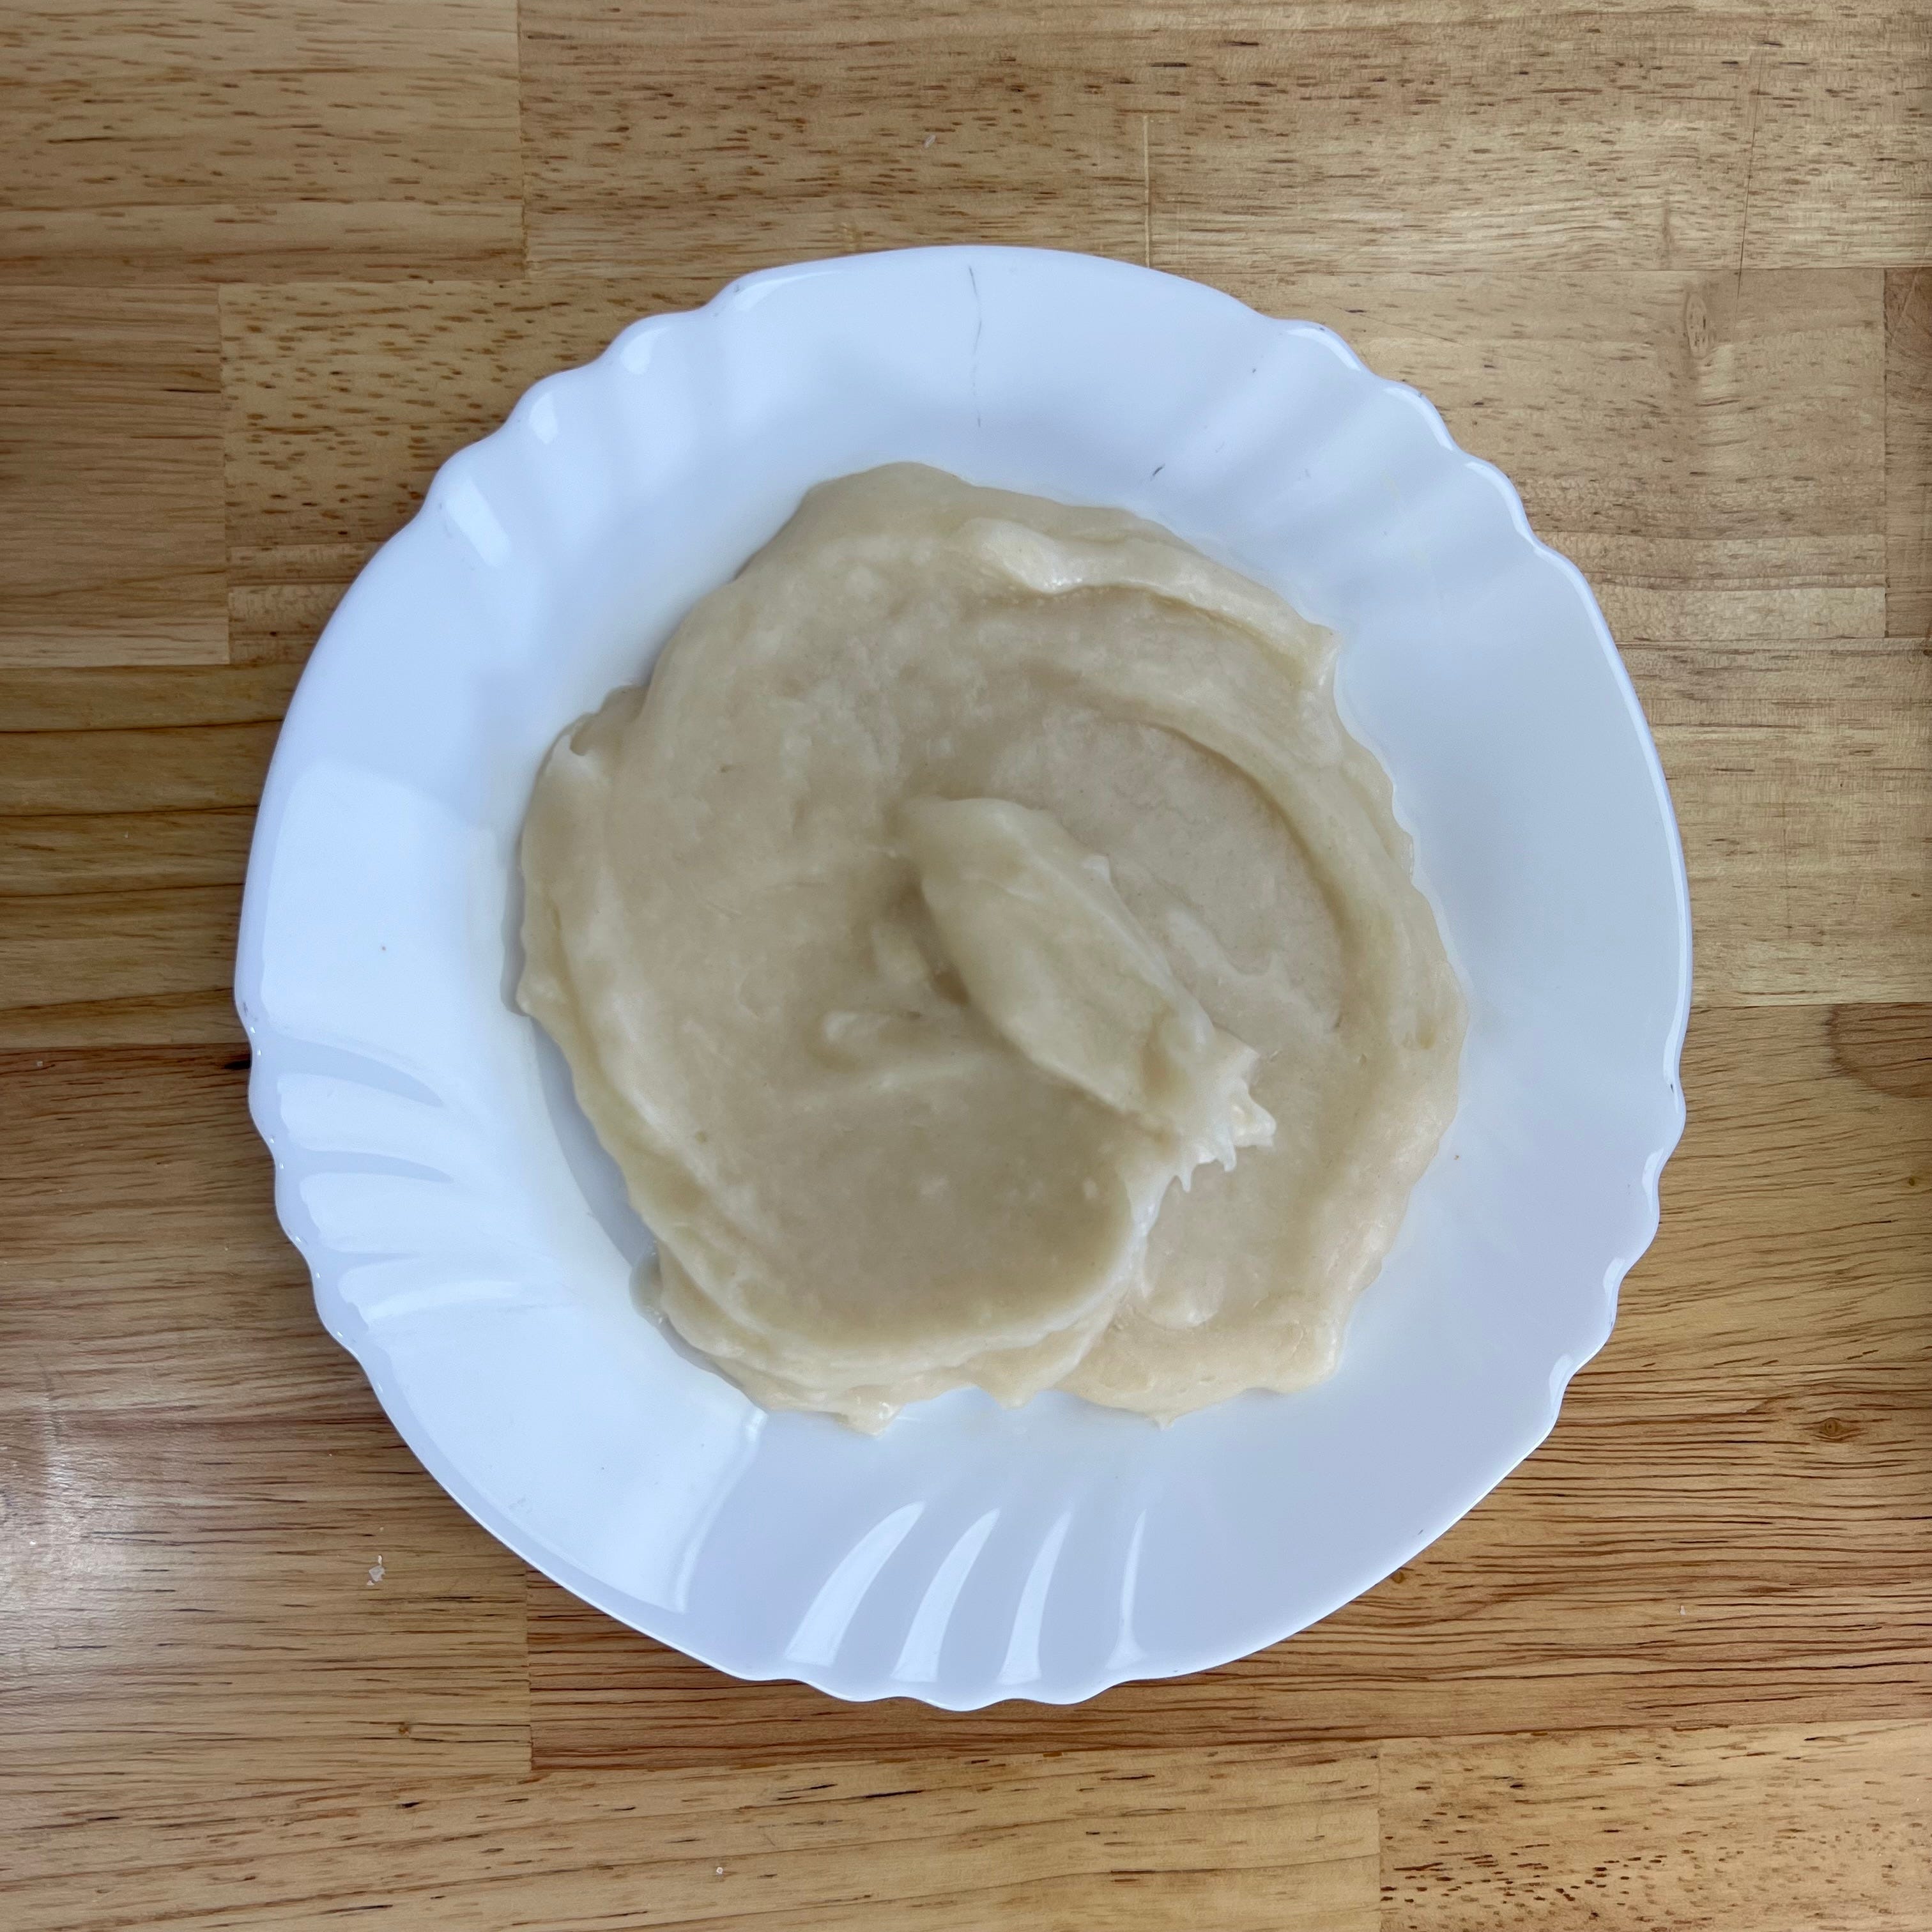
To make the tangzhong (8AM): In a saucepan, mix together the flour and water. Cook over medium-low heat, stirring constantly until a paste forms. Do not boil. The paste will form quickly.
Place the paste in a bowl or on a plate, cover, and chill in the refrigerator while making the dough.

To make the dough (9AM): In the bowl of a stand mixer fitted with the paddle attachment, add the flour, milk, egg, sugar, salt, active levain, powdered milk (if using), and tangzhong.
Mix on low speed until the ingredients come together and no dry flour is visible, approximately 2 minutes.
Switch to the dough hook attachment and mix on medium speed for 4 to 5 minutes until the dough smooths and begins to pull away from the sides of the bowl.
Let the dough rest in the bowl for 10 minutes.
Turn the mixer on low speed and mix for 2 to 4 minutes until the dough gains more strength and begins to pull away from the sides of the bowl again. Keep the mixer running.
Slowly add the room temperature butter, one tablespoon at a time. This will take about 5 minutes.
To bulk ferment (9:30AM): Place the dough in an oiled bowl or container, cover, and bulk ferment in a warm spot (77°+F) until doubled in volume for about 4-6 hours (see fig. 1). If time is short, place the doubled dough into the refrigerator overnight and continue the next day.
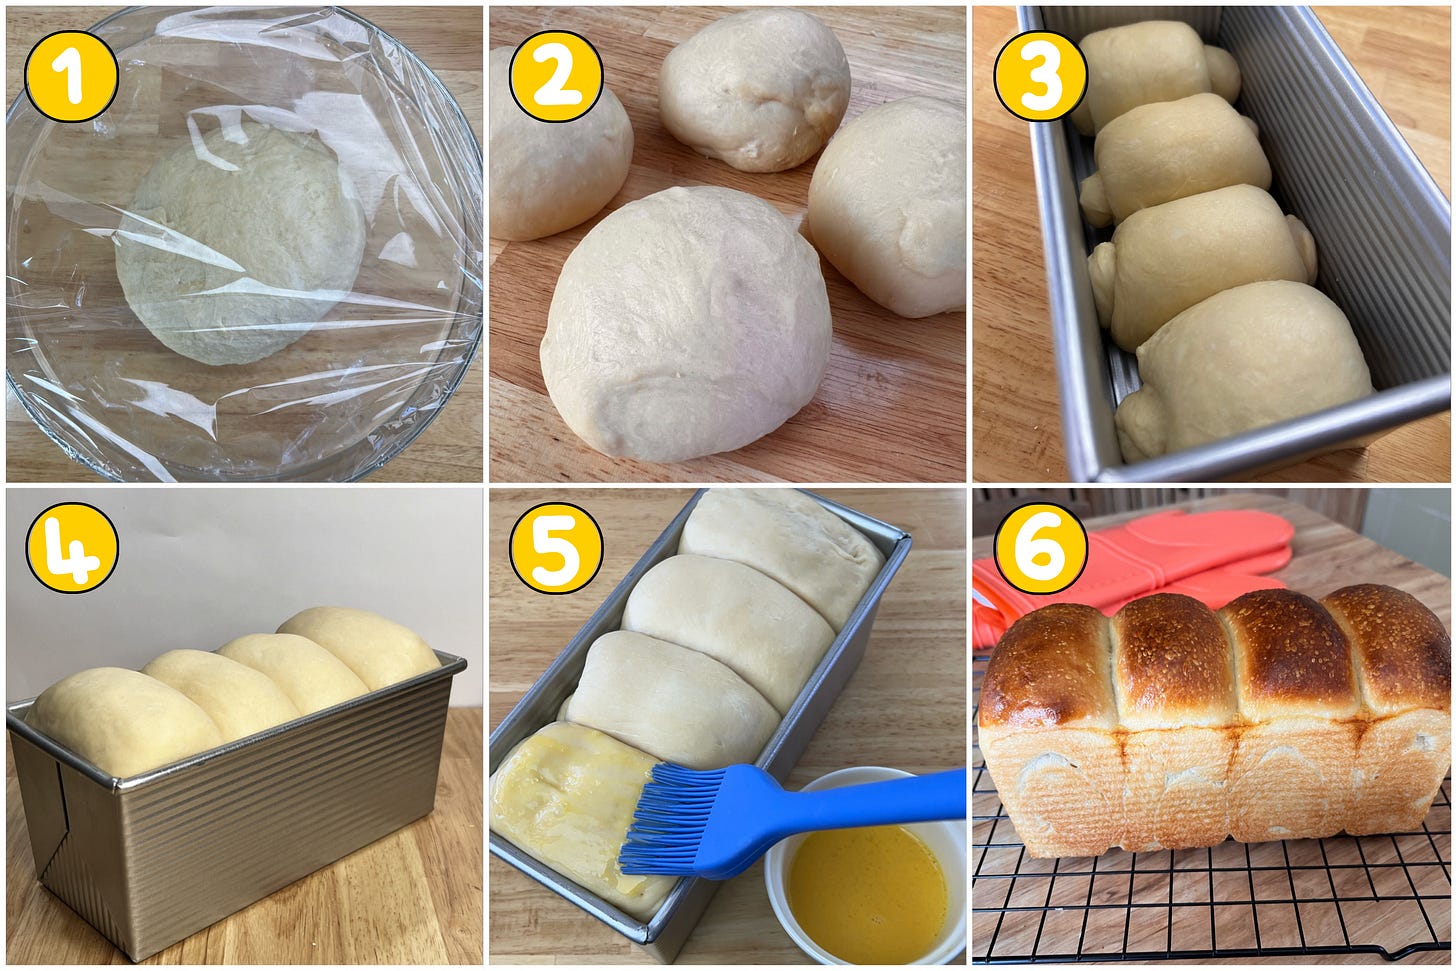
Figure 1. fermentation, Figure 2. shaping, Figure 3. rolling spirals, Figure 4. proofing, Figure 5. egg wash, Figure 6. cooling the loaf To divide and shape the dough (1 or 3PM): With a dough scraper, Turn the dough out onto the work surface with the smooth topside down.
Using a bench scraper and kitchen scale, divide the dough into 4 equal parts.
Fold the corner of each section of dough into itself forming a ball. Turn the ball smooth side up and use your hand and bench scraper to pull each of the 4 balls across the work surface to create some tension in forming tight, smooth balls (see fig. 2).
Grease a 9x4x4-inch Pullman loaf pan (or other similar pan).
Using a rolling pin, flatten each dough ball into a long oval, about 10 inches long and 4 inches wide. Starting with the short side, roll the dough into a tight spiral. Place all 4 rolled spirals into the prepared pan (see fig. 3).
To proof the dough a second time: Cover the pan with plastic wrap and set it in a warm place (77°+F). Let the dough rise until puffy and fills the pan up to an ½-inch below the top (if using a pullman pan with lid) or a bit higher if not using a lid (see fig. 4).
To make the egg wash: Beat the egg and add the milk. Brush the tops and crevices of the dough with the egg wash (see fig. 5).
To bake: Preheat the oven to 350° F (Calibrate with an oven thermometer). Bake for 40 to 45 minutes or until the loaf is golden brown and the internal temperature is 195-200F using a probe thermometer.
Cool the loaf completely on a wire rack before slicing (see fig. 6). Enjoy!

Here are some other possibilities for eating Japanese Milk Bread…


Equipment (Disclosure: Items below include affiliate links with Amazon USA. You pay the regular price, and I get a small commission.) I only recommend products that I own myself and know to be excellent quality. I often get asked on social media sites about my kitchen tools, so here are most of them used to make this recipe.
9”x4”x4” Pullman bread pan (Any suitable bread pan of the same size will be fine; if you want the perfectly square load, a Pullman pan with lid is necessary.)
Mixing bowls (I like this oven-proof glass set of 10 for mixing and portioning out ingredients.)
Stand mixer (This dough can be mixed by hand, but a stand mixer ensures consistency, especially when incorporating the butter.)
Bench scraper and dough scraper (These tools cut and scrape doughs.)
Sauce pan (This is a versatile pan that works on all cooktops.)
Rolling pin (This pin rolls dough to desired thickness.)
Glass jar with lid (The straight sides are perfect for sourdough starter.)
Kitchen scale (Ingredients should be weighed rather than relying on volume.)
Probe thermometer (Bread temperature must be checked for doneness.)
Oven thermometer (All ovens need calibration, an in-oven thermometer is essential.)
Silicon oven mitts (I’ve burned my hands too many times with cloth mitts.)
Could I just buy a loaf from you? 😄